Stuffed Peppers


Last night I made stuffed peppers for the first time. I was surprised how easy they were to make and they look quite fancy on the dinner table.

There are many different stuffed pepper recipes online. To make the peppers just cut the tops off and carve out the inside. Boil the peppers for five minutes and then stuff them with whatever filling you would like. I used a tuna casserole-style filling: tuna, celery, onion, pasta and cream cheese, salt and pepper. Then I topped them with bread crumbs and chedder cheese.

They were pretty good but next time I think I will try a spicy ground beef mixture, maybe with some guacamole and lemon juice.

Tissue Paper Roses!

Tissue Paper Flowers


If you need a last minute bouquet for your sweetheart but you're short on cash give these simple tissue paper roses a try. Not only are they much more affordable than real roses on Valentine's Day, but they are pretty and everyone will appreciate your efforts.

Years ago when I was waitressing a man who didn't have enough money for a tip made me a rose out of a cocktail napkin. After he taught me how to do it I used the trick over and over. I often pass on the gesture by leaving roses on my table (with a tip) for the servers when I go out to eat.

I've made them for a few people in the past. With tissue paper, you can choose any colour or pattern that you like. I once made someone a bouquet filled with leopard, zebra and tiger print roses.


First: Cut yourself a square of tissue paper. The longer the piece, the thicker the rose will be. Fold one of the long edges over and make little rips all the way along the fold. The folded edge with the rips will be the head of the flower.


Second: Begin to roll the paper up. Start tight for a couple turns and then make your roll loose as you keep going.


Third: Once you have rolled up the tissue, pinch the end with the fold about an inch and a half down. Begin to twist everything below the pinch as tightly as you can. This will be the stem.


Fourth: If you want a little leaf, pull a bit of the tissue away as you are rolling the stem and then keep twisting the rest of the stem tight. Shape the bit you left out until it looks like a leaf.

Smoosh the flower-end against the table to wrinkle it a bit and then adjust the petals until it looks like a rose.


All Done!

The ultimate craft project


I have had my dollhouse for 21 years now. It is the ultimate ongoing project.

When I got it as a Christmas present the dollhouse market was enjoying a resurgence of popularity. In the years that followed I collected furniture from many different cities. Vancouver had a few great miniature stores at the time. One fantastic antique store in Steveston, Richmond had a huge collection of tiny furniture and supplies for dollhouse enthusiasts. North Vancouver also had a dollhouse furniture store that catered to collectors and sold everything you could possibly need to outfit your house. There was also a great craft store in Richmond Centre Mall back in the day that sold miniature furniture. And when my parents would take us on summer road trips I always collected pieces from stores in other cities. The stores that I knew of in Vancouver are gone now. And although I have worked in childcare for almost 15 years, I haven't found a little girl who had a real, old-fashioned dollhouse. Kids only have Barbie dream houses now.

Anyway, I shot some pics of my house the other day when I was visiting my parents for Christmas. Unfortunately I couldn't take any shots of the front of it because it is currently tucked away in a corner.

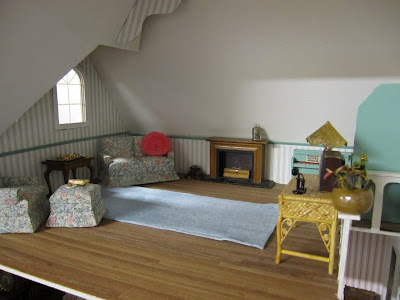
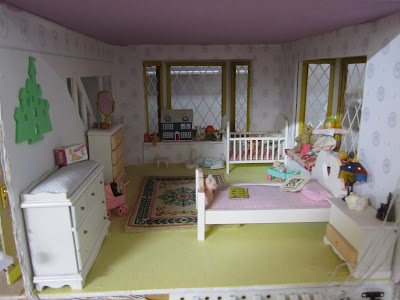
I never really played with it. People always ask me, "where are the people?" I never found it necessary to buy a family for my house. I had little interest in playing with it. All I ever wanted to do was set it all up, take it all down and then set it up again in a different way. When I got older and began to "renovate" my house, I finally had to choose which rooms would be for what. It was definite as I was choosing wallpaper and flooring and would no longer be using the tiny bathroom as the poor, adopted maid's room. Or the large living room as a kitchen.

Short of actually building the house, I did everything else. It took years and it is still not finished. I shingled the roof - tiny shingle by shingle. I wired it so that all the tiny lamps plug in and light up. I wallpapered it, put in the flooring, spackled the outside walls and painted the whole thing. It really did take me years to do.

I still need to hinge the doors, which I have successfully put off doing for years because the hinges and the nails are approximately the size of fleas. Try using a real hammer on nails the size of fleas and you'll understand why it takes so damn long to get something like this done.

Anyway, the days of collecting furniture for it are over since it appears that craft and children's stores no longer cater to dollhouse folk. Luckily all I really still need is a new fridge. The one in the house doesn't look right.

I'll hang onto the house in case I have my own daughter. That was always my plan. Even when I was little, I was decorating it with the knowledge that I would someday give it to my own little girl. If I don't have a daughter, I sure won't be saving it for another 30 years until I have a granddaughter. I'll put it on the ebay market and sell it to the highest bidder.

But for now it is still fun to set it up for my Mom at Christmas (takes me nearly three hours to get all the tiny pieces in their place) and pull out all the bits and remember where they came from. I really hope that I have the chance to pass it on to my own girl and watch her spend hours tinkering with all the pieces like I did when I was little.


More Christmas Eggs


A hunting themed egg for my wilderness-addict father. I've been saving the little owl since high school. I guess it finally found it's place. It's hard to photograph the eggs. It is difficult to capture the detail on the outside and the inside while getting a close enough shot. This one has a moose, a cabin, moss and a night sky with snowflakes and stars.
One of my favorite eggs from when I was a child has a little church inside. So I decided to recreate it. This one turned out nice, but I have noticed that the quality and variation of the tiny things you can find these days just isn't the same as the things my auntes used years ago.
An egg (above) for one of the families I work for. This one has two little brown birds in a nest with a forest in the background and an orange butterfly perched on the outside.

The egg below I made for my little cousin in Alberta. She is totally into fish so I thought that I would make her a tiny aquarium inside the egg, like a Christmas fishbowl. This shot isn't good enough, the egg is decorated on the outside and the inside with fish, shells, rocks, seahorses, starfish and seaweed. I particularly like the way the pearls fit the theme.
Making these little egg decorations is a family tradition. My aunt Janet MacNaughton was an artist on Hornby Island and Maui and made everything from decorative tiles to stained glass windows. I don't know when she started making these eggs; sometime before I was born. At some point her daughter, my older cousin Aleisha picked up the craft and Janet also taught her younger sister, my aunt Kathie how to make them as well. As I was growing up, Kathie and Janet gave us eggs for Christmas every year and that collection still adorns my parent's annual Christmas tree...despite my mother's changing tree styles.

But Christmas decorations are like that aren't they? A constant, a yearly reminder.

I'm always excited to make new things. This year I decided that I wanted to carry on the tradition and my aunt Kathie handed me the torch by showing me how to carve them without breaking them.

I worked on the eggs for several days. I kept the first one for myself and the rest will be opened on Christmas day and hung on trees in my friend's and family's homes.

I quickly finished the four that Kathie had lent me from her egg stash and then found myself driving out to Chilliwack to purchase more goose eggs from Fraser Valley Duck and Goose, at the base of a little mountain 75 kms outside of the city. It was a long drive but it was worth it to have the opportunity to craft something beautiful like the older women in my family.

When searching the city for tiny things to put inside the eggs, I happened into an antique/junk store in Gastown and to my surprise, sitting in a bowl at the back of the store were some smaller duck eggs. So I grabbed some of those as well. I hope that before next year I can find somewhere closer than Chilliwack to purchase eggs. Chicken eggs and duck eggs can be used as well, but the large goose eggs are more dramatic, as Kathie says. And quite frankly, it's hard to find things small enough to put inside the big ones anyway.

foil, feathers and fotocopies


I made a bunch of cute cards over the weekend. I found this felt pen at a local craft store that transfers photocopied images onto other paper. So I took the last of my card stock and transferred photocopied pics of buildings, statues and old music sheets. Then I just added some feathers and some amazing German foils that I found at Urban Source.

To make the cards extra special, I affixed an old stamp to each one. They turned out great, kind of like envelopes with the goodies on the outside!


Sockrrz for sale!


I'll be selling some of the newest Sockrrz at the Croatian Cultural Centre's annual flea market on November 14th. My mom will be there selling off some antiques and I'll stick around long enough to find loving homes for these poor little orphaned monkeys. Stop by if you're in the Commercial Drive neighbourhood and you can buy a monkey or we can leave them to be babysat by my mom and go for coffee!

3250 Commercial Drive, Vancouver.
www.croatiancentre.com